
<plugin>
    <groupId>org.codehaus.mojo</groupId>
    <artifactId>build-helper-maven-plugin</artifactId>
    <version>3.2.0</version>
    <executions>
        <execution>
            <id>add-source</id>
            <phase>generate-sources</phase>
            <goals>
                <goal>add-source</goal>
            </goals>
            <configuration>
                <sources>
                    <source>${project.basedir}/src/main/resources</source>
                </sources>
            </configuration>
        </execution>
    </executions>
</plugin>Part 1: Modeling and Product Configuration
Defining the Products
In this chapter we will define our products HC-Optimal and HC-Compact in Faktor-IPS. For this purpose, we will use the product definition perspective specifically designed for the end users.
First, you have to create a new project named HomeProducts with a source directory productdata. To do this, use the Faktor-IPS archetype on the command line.
mvn archetype:generate -DarchetypeGroupId=org.faktorips -DarchetypeArtifactId=faktorips-maven-archetype -DarchetypeVersion=21.12.0 -DgroupId=org.faktorips.tutorial -DartifactId=HomeProducts -Dversion=1.0 -Dpackage=org.faktorips.tutorial.productdata -DJavaVersion=1.8 -DIPS-Language=en -DIPS-IsModelProject=false -DIPS-IsProductDefinitionProject=true -DIPS-SourceFolder=productdata -DIPS-RuntimeIdPrefix=home. -DIPS-ConfigureIPSBuild=true
This time, the chosen type is product definition project (-DIPS-IsProductDefinitionProject=true), the package name org.faktorips.tutorial.productdata and the runtime-ID prefix home.. Make sure to enter the full stop (.) at the end of the prefix. For each of the new product components, Faktor-IPS will define an ID with which to identify the product component at runtime. Per default, this RuntimeId is composed of the prefix, followed by the (unqualified) name of the product component [11]. The qualified name is not used for identification purposes at runtime, because the package structure only serves to organize the product data at development time. This way the product data can always be refactored without affecting the operational systems that might be involved.
[11] In an upcoming generation of Faktor-IPS there will be an extension point so you can implement your own way of assigning a RuntimeId.
The newly created project must be imported into the Eclipse workspace. Click File ► Import ► Maven► Existing Maven Projects. In the dialog add the project folder as the root directory and import the project by clicking on Finish.
Faktor-IPS generates Java source files and copies XML files, which are 100% generated, into the directory src/main/resources. The contents of the directory can therefore be deleted and recreated at any time.
Since the source code for formulas is also generated in this folder in the course of this tutorial, Maven must be instructed to also build the src/main/resources folder. To do this, the following code must be added to the pom.xml file under <plugins>:
We will manage the product data in a separate project to account for the fact that the responsibility for the product data might well be held by a different team and might have different release cycles. The product definition team could, for example, design and release a new product named HC-Flexible without making changes to the model. In order for the classes of the HomeModel to be available to the new project, a reference to the HomeModel project needs to be defined in the product definition project in Faktor-IPS.
In Faktor-IPS this is achieved in a way which corresponds to the definition of the build path in Java.
In order to make the HomeModel Java classes available to the project, you have to add a dependency to the project HomeModel to the pom.xml of the project HomeProducts. Simply add the following entry under <dependencies> in the pom.xml file:
<dependency>
    <groupId>org.faktorips.tutorial</groupId>
    <artifactId>HomeModel</artifactId>
    <version>1.0</version>
</dependency>
Then the JUnit 5 libraries have to be added to the project, as we will write a test class later. To do this, add the following dependencies to the pom.xml file:
<dependency>
    <groupId>org.junit.jupiter</groupId>
    <artifactId>junit-jupiter-engine</artifactId>
    <version>5.8.2</version>
    <scope>test</scope>
</dependency>
<dependency>
    <groupId>org.junit.platform</groupId>
    <artifactId>junit-platform-runner</artifactId>
    <version>1.8.2</version>
    <scope>test</scope>
</dependency>
The tutorial projects are to be created with Java 8. If Java 11 was used, the following dependency must be added:
<dependency>
    <groupId>javax.xml.bind</groupId>
    <artifactId>jaxb-api</artifactId>
    <version>2.3.1</version>
</dependency>
In order for the changes in the pom.xml file to take effect, right-click on the HomeProduct project and select Maven ► Update Project ► Ok.
As a first step, open the product definition perspective by clicking Window ► Perspective ► Open Perspective ► Other ► Product Definition [12]. If you have any open editors, close them now in order to have the end users' view of the system. In the Problems View, you have to deactivate all filters except for the Faktor-IPS filter (usually, there should be at least the default filter) so that only Faktor-IPS markers remain visible in that view (but no Java markers, etc.).
[12] There is a special installation option (in Eclipes terms: a special product) for business users wishing to use Faktor-IPS. This installation provides only the product definition perspective.
Initially, we will create two IPS packages; one for the products (products) and one for the coverages (coverages). As in the Java perspective, this is done either via the dropdown menu or the toolbar (select "HomeProducts" as source folder).
You can also create any additional directories such as a doc directory for managing documents pertaining to the products.
First, we will create the HC-Optimal product. Select the above created package named products and click the toolbar button  . A wizard for creating new product components will open. The wizard lists those product classes available in the model, for which you can create product components. Select
 HomeProduct.
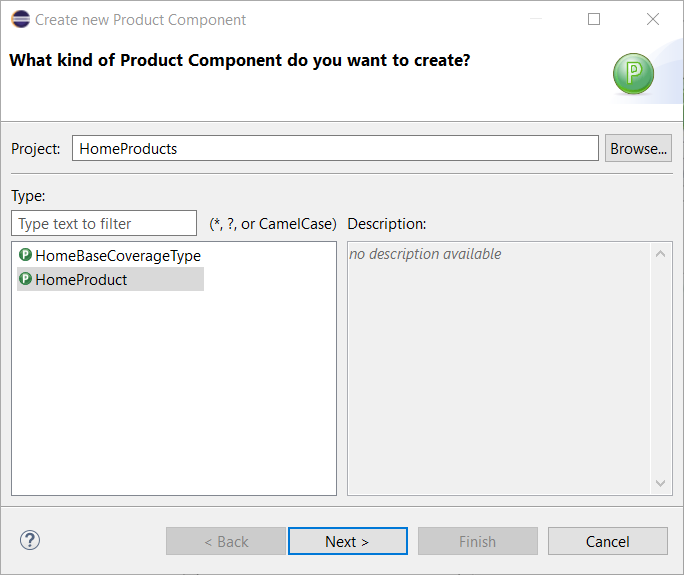
Figure 1. Selecting the product component type
In case you cannot see a product class, the reference to the HomeModel project in the Faktor-IPS build path is missing (see above). Select Next to go to the next page of the wizard.
Here you enter the name of the product component. When you click Finish, the product component will be created in the file system.
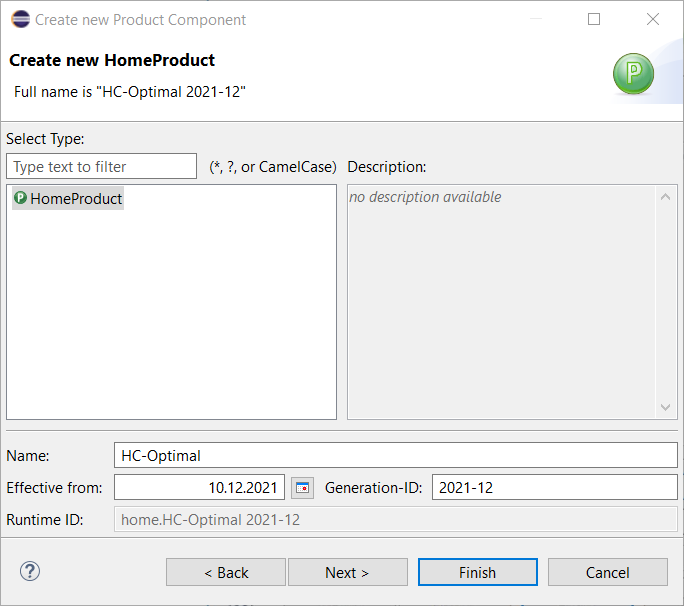
Figure 2. Creating a New Product
By double clicking on the product component in the product structure explorer the editor for the component will open.

Figure 3. The Product Component Editor for HC-Optimal
The first editor page shows:
-
Attributes
Contains the properties of the product. Any attributes defined in the product class will be listed here. -
Defaults and Value Sets
Contains defaults and value ranges for the different policy attributes. -
Structure
Contains any other product components that are used.
Now enter the data for the HC-Optimal product according to the following table:
| Configuration property | HC-Optimal |
|---|---|
Product name |
Home Contents Optimal |
Proposed sum insured per sqm of living space |
900 EUR |
Default payment mode |
1 (annual) |
Allowed payment modes |
1, 2, 4, 12 |
Default living space |
<no default value> |
Allowed living space |
0-2000 |
Default sum insured |
<no default value> |
Sum insured |
10000 EUR - 5000000 EUR |
When creating the product component, you received the following error message:

Figure 4. Error message when creating the product component
To fix this, we will now create the base coverage type for the product. Select the coverages package and define a new product component named BaseCoverage-Optimal based on the HomeBaseCoverageType class.
Now we must assign the coverage type to the HC-Optimal product. You can do this by simply dragging and dropping the coverage type from the Model Explorer. Open the HC-Optimal product. Drag the BaseCoverage-Optimal from the Product Definition Explorer to the node HomeBaseCoverageType in the Structure section.
Under Association type we must select Mandatory, because it is a 1..1(1) relation. (The reason is the defined association between HomeProduct and „HomeBaseCoverageType“.)
In the next step, we will create the HC-Compact product including the BaseCoverage-Compact. The process is the same as for the HC-Optimal product. Alternatively, you can use a copy wizard that enables you to copy a product component along with any other components it may use.
If you want to try this, select the HC-Optimal product within the Product Definition Explorer and choose New ► Copy Product … from the dropdown menu. On the first page, enter Optimal as the Search Pattern and Compact as the Replace Pattern, click Next and then click Finish. Faktor-IPS will now create the HC-Compact and BaseCoverage-Compact.
You can now open the new product HC-Compact and enter its data:
| Configuration property | HC-Compact |
|---|---|
Product name |
Home Contents Compact |
Proposed sum insured per sqm of living space |
600 EUR |
Default payment mode |
1 (annual) |
Allowed payment modes |
1, 2 |
Default living space |
<no default value> |
Allowed living space |
0-1000 |
Default sum insured |
<no default value> |
Sum insured |
10000 EUR - 2000000 EUR |
For the time being, the definition of both products is now complete. They should appear as follows inside the Product Definition Explorer:
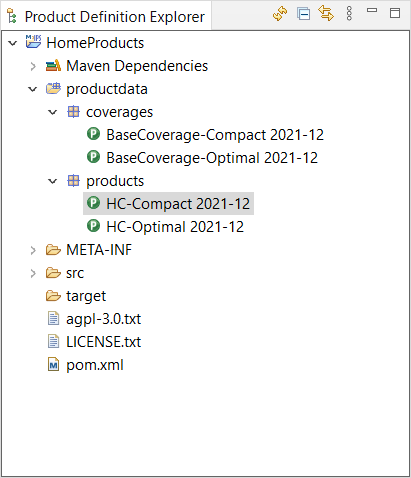
Figure 5. The Products are displayed in the Product Definition Explorer
In addition to the Product Explorer, two more tools are available to analyze the product definition. You can use the dropdown menu option Show Structure to view a product’s structure and Search References to see the different usages of a component. Furthermore, you can define any package order by clicking Edit Sort Order.
On the right hand side of the product component editor, you can find a Model Description View that will show the documentation of the product class that relates to the product component you are currently editing. If you want to try this, you can document an attribute, e.g. "productName", in the model, close the component editor and open it again.