
Part 1: Modeling and Product Configuration
Hello Faktor-IPS
First we will create a Faktor-IPS project, define a model class, and generate the Java source code of this class.
If you have not yet installed Faktor-IPS, you must do it now. The software and installation instructions are available at https://www.faktorzehn.org/de/download/. In this tutorial we will use Eclipse 4.22 (2021-12) and Faktor-IPS 21.12.0 in English.
Start Eclipse now. Ideally, you should use a separate workspace for this tutorial. If Faktor-IPS has been installed correctly, you will see the following toolbar icons when you open the Java Perspective[3]:
Figure 1. Faktor-IPS Icons
[3] Click in the menu options Window ► Perspective ► Open Perspective ► Java
If the Model Explorer is not visible, that’s because you used this workspace before you installed Faktor-IPS. In this case, select Window ► Perspective ► Reset Perspective.
Faktor-IPS projects are regular Java projects or Maven projects with an additional Faktor-IPS Nature. First, create a new Maven project named "HomeModel".
For this the Maven archetype for Faktor-IPS can be used, which creates a Maven project with the Faktor-IPS Nature.
Open the command line and navigate to the directory in which you want to create the project. From there, run the following command:
mvn archetype:generate -DarchetypeGroupId=org.faktorips -DarchetypeArtifactId=faktorips-maven-archetype -DarchetypeVersion=21.12.0 -DgroupId=org.faktorips.tutorial -DartifactId=HomeModel -Dversion=1.0 -Dpackage=org.faktorips.tutorial.model -DJavaVersion=1.8 -DIPS-Language=en -DIPS-IsModelProject=true -DIPS-IsProductDefinitionProject=false -DIPS-SourceFolder=model -DIPS-RuntimeIdPrefix=home. -DIPS-ConfigureIPSBuild=true
This command created the Maven project "HomeModel". The Faktor-IPS Nature and with it the runtime libraries of Faktor-IPS have been added to the project.
In this project we will create the model classes. We have named the source directory in which the model definitions are stored as "model" (through the parameter -DIPS-SourceFolder=model).
Within this directory, the model can be structured using packages, as in Java. Like Java, Faktor-IPS uses qualified names to identify the classes of the model.
The base package for the generated Java classes was named "org.faktorips.tutorial.model" (through the parameter -Dpackage=org.faktorips.tutorial.model). The runtime-ID-prefix is "home.".
The meaning of the runtime-ID-prefix is explained in the chapter "Defining the Products".
The exact functions of the used parameters can be found in the documentation of the archetype.
The newly created project must be imported into the Eclipse workspace. Click File ► Import ► Maven► Existing Maven Projects. In the dialog, add the project folder as the root directory and import the project by clicking on Finish.
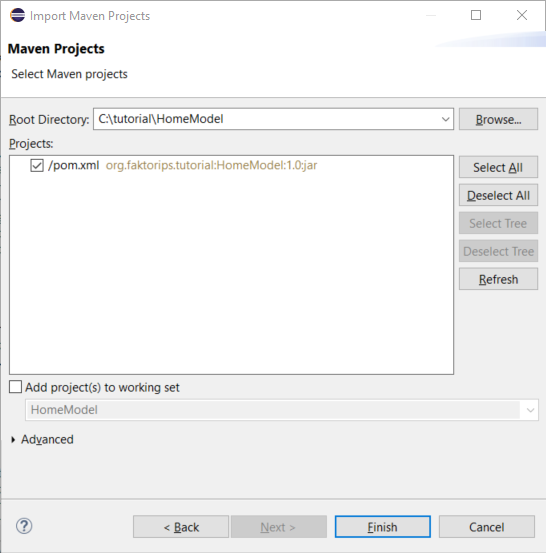
Figure 2. Import the Maven project into Eclipse
Before defining your first class named HomeContract, you have to configure your Project settings to automatically build your workspace (Project ► Build automatically).
First, go to the Faktor-IPS Model Explorer right next to the Package Explorer.
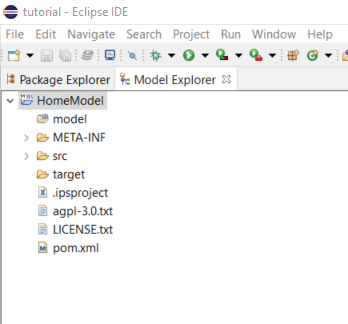
Figure 3. The Project View of the Model Explorer
The Model Explorer will display your model definition without the Java details. The properties of the Faktor-IPS project are stored in the file ".ipsproject". This includes, for example, the information entered in the AddIpsNature dialog box/archetype parameters, settings relating to the generation of code, permitted data types etc. The content is stored in XML and documented in detail in the file.
We will store our classes inside a package named "home". To create IPS packages, right-click on the "model" source directory and use the dropdown menu to define a new IPS package named "home" (new ► IPS Package).
Alternatively, you can create IPS packages using the button  in the toolbar.

Figure 4. Creating a IPS package
Our next step is to create a class that will represent our home contract. Select your new package in the Package Explorer and press the toolbar button  .
.
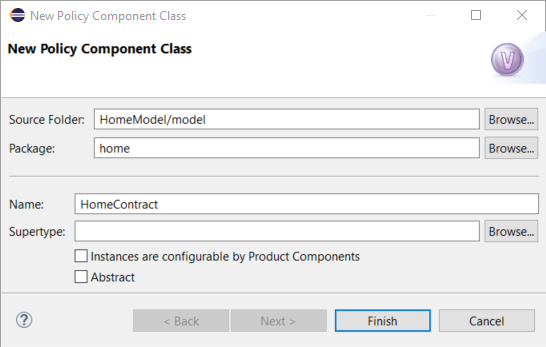
Figure 5. Creating a new Contract Class
In the dialog box, your source directory and package are already prefilled with the appropriate names, so you just have to add the class name "HomeContract" and click Finish.
Faktor-IPS has now created the new class and opened the editor. When you switch back to the Package Explorer, you can see that the "HomeContract" class resides in a separate file named "HomeContract.ipspolicycmpttype".
Furthermore, the Faktor-IPS source code generator will have created two Java source files:
org.faktorips.tutorial.model.home.HomeContract and
org.faktorips.tutorial.model.home.HomeContractBuilder.
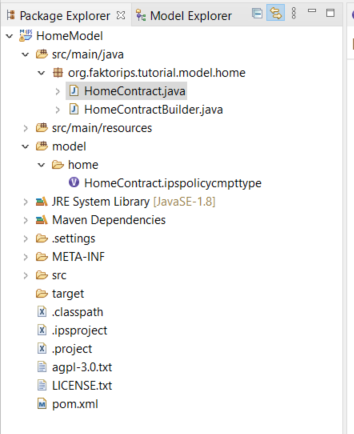
Figure 6. Generated Classes
A quick glance at the source code reveals that some methods have already been generated here, including methods for converting objects to XML and for validation.
The class „HomeContractBuilder“ creates contract structures using the builder design pattern.