There is one big advantage to loading data with a classloader rather than from the file system: It is completely platform independent. This way, the code can run unchanged, for example, under z/OS.
Part 1: Modeling and Product Configuration
Runtime Access to Product Information
Now that we have captured the product data, we will examine how to access them at runtime (inside an application or test case). We will write a JUnit-Test and extend it further in the second part of this tutorial.
For product data access, Faktor-IPS supplies the IRuntimeRepository interface. The implementation ClassloaderRuntimeRepository provides access to the product data captured with Faktor-IPS and loads the data using a classloader. Faktor-IPS does two things to enable this:
-
Any files containing product information are copied into the Java source folder named
src/main/resources. Consequently, those files are included in the build path of the project and can be loaded with the classloader. -
A table of contents details which data are contained in the
ClassloaderRuntimeRepository. Faktor-IPS generates this table of contents (toc) to a file that is referred to as a toc file and has a standard name offaktorips-repository-toc.xml.
A ClassloaderRuntimeRepository is created by the static create(…) method of the class. The path to the toc file is passed as a parameter. The Classloader.getResourceAsStream() method reads the toc file directly upon creation of the repository. Any additional data are loaded (also via the classloader), when they are accessed.
To get a product component, invoke the getProductComponent(…) method that gets the RuntimeId of the component passed as a parameter. As the IRuntimeRepository interface does not depend on a specific model (like the HomeModel in our case), you have to cast the result to the respective product class.
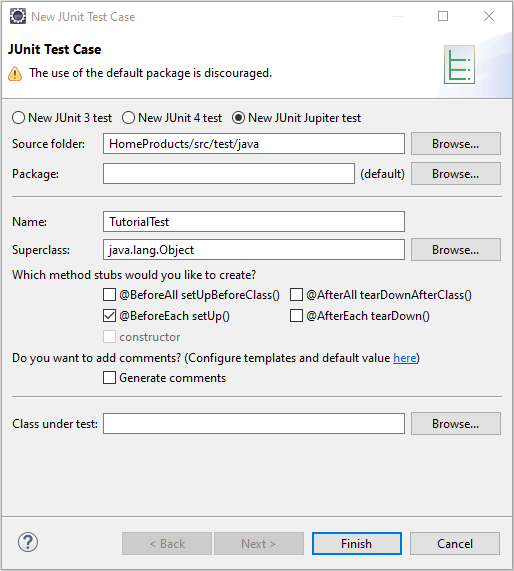
Let us try this on a JUnit test case. Create the source folder src/test/java and create a JUnit test case by clicking the toolbar button  and choosing JUnit Test Case. In the dialog box, enter “TutorialTest” as the name of the test case class and mark the checkbox stating that the
 setUp() method should be generated as well.
For the purposes of our tutorial, we will ignore the warning that advises against the usage of the default packages.

Instead of carrying out checks with assert statements, we will just print the results on the console with println.
Do not forget to adjust the year in your class name if it is not 2019-07
public class TutorialTest {

    private IRuntimeRepository repository;
    private HomeProduct compactProduct;

    @BeforeEach
    public void setUp() throws Exception {
        // Repository erzeugen
        repository = ClassloaderRuntimeRepository
                .create("org/faktorips/tutorial/productdata/internal/faktorips-repository-toc.xml");

        // Referenz auf das compactProduct aus dem Repository holen
        IProductComponent pc = repository.getProductComponent("home.HC-Compact 2021-12");

        // Auf die eigenen Modellklassen casten
        compactProduct = (HomeProduct) pc;
    }

    @Test
    public void test() {
        System.out.println("Product name: " + compactProduct.getProductname());
        System.out.println("Proposed sum insured per sqm: " + compactProduct.getProposedSumInsuredPerSqm());
        System.out.println("Default modes of payment: " + compactProduct.getDefaultValuePaymentMode());
        System.out.println("Allowed modes of payment: " + compactProduct.getAllowedValuesForPaymentMode());
        System.out.println("Default sum insured: " + compactProduct.getDefaultValueSumInsured());
        System.out.println("Range sum insured: " + compactProduct.getAllowedValuesForSumInsured());
        System.out.println("Default living space: " + compactProduct.getDefaultValueLivingSpace());
        System.out.println("Range living space: " + compactProduct.getAllowedValuesForLivingSpace());
    }
}
If you run the test now, it should print the following:
Product name: Home Contents Compact
Proposed sum insured per sqm: 600.00 EUR
Default modes of payment: 1
Allowed modes of payment: [1, 2]
Default sum insured: MoneyNull
Range sum insured: 10000.00 EUR-2000000.00 EUR
Default living space: null
Range living space: 0-1000
We have now gained some insight into modeling with Faktor-IPS. In addition, we have created some simple products and accessed product data at runtime.
The second part of this tutorial will give an introduction to the usage of tables and formulas. These will then be used to extend the model so that business users can flexibly add extra coverages without having to extend the model.