

Part 2: Using Tables and Formulas
Using Tables
In this chapter we will create tables that capture rating districts and premium rates and add them to our model. After that we will write code to determine which rating district will be applied to a particular contract.
Rating District Table
As the risk of damage through burglary varies from region to region, insurers usually apply different rating districts to their home contents insurance products. This is generally done using a table that maps zipcode areas to their respective rating districts. In Germany, such a table could look like this which we need later on:
| zipcodeFrom | zipcodeTo | rating district |
|---|---|---|
17235 |
17237 |
II |
30159 |
45549 |
III |
59174 |
59199 |
IV |
47051 |
47279 |
V |
63065 |
63075 |
VI |
… |
… |
… |
Rating District Table
For all zipcodes that do not fall into one of these areas, rating district I will be applied.
Faktor-IPS distinguishes between the definition of table structure and table contents. The structure of a table is created as part of the model, whereas the table contents can be managed either as part of the model or as part of the product definition, depending on what it contains and who is responsible for maintaining the data. There can be many table contents relating to one table structure.
Let us first create the table structure of the rating district table. To do this, you have to switch to the Java-Perspective. In HomeModel project, select the model/home folder and click the toolbar button  . Name the table structure "RatingDistrictTable" and click Finish.
Select the table type SINGLE_CONTENT, because we want this structure to have only one content. Now we will create the table columns. All three columns (zipcodeFrom, zipcodeTo, ratingDistrict) are of type String.
The task of defining the zipcode area is where it gets interesting. The table structure we have created so far ultimately serves to establish a function (in the mathematical sense) of ratingDistrict → zipcode. This, however, can not be done just with the column definition and a potential unique key. Therefore, Faktor-IPS provides a way to model columns (or one column) representing a range.
You can now go ahead and create a new range. As the table contains the columns "zipcodeFrom" and "zipcodeTo", you can choose the type Two Column Range. Enter "zipcode" as parameter name for the accessor method and map both the "zipcodeFrom" column and the "zipcodeTo" column.
Figure 1. Creating a Range in a Table Structure
Now you have to create a new unique key index. Make sure NOT to map the separate columns zipcodeFrom and zipcodeTo to this key; instead map the range to it. You can then save the structure description.
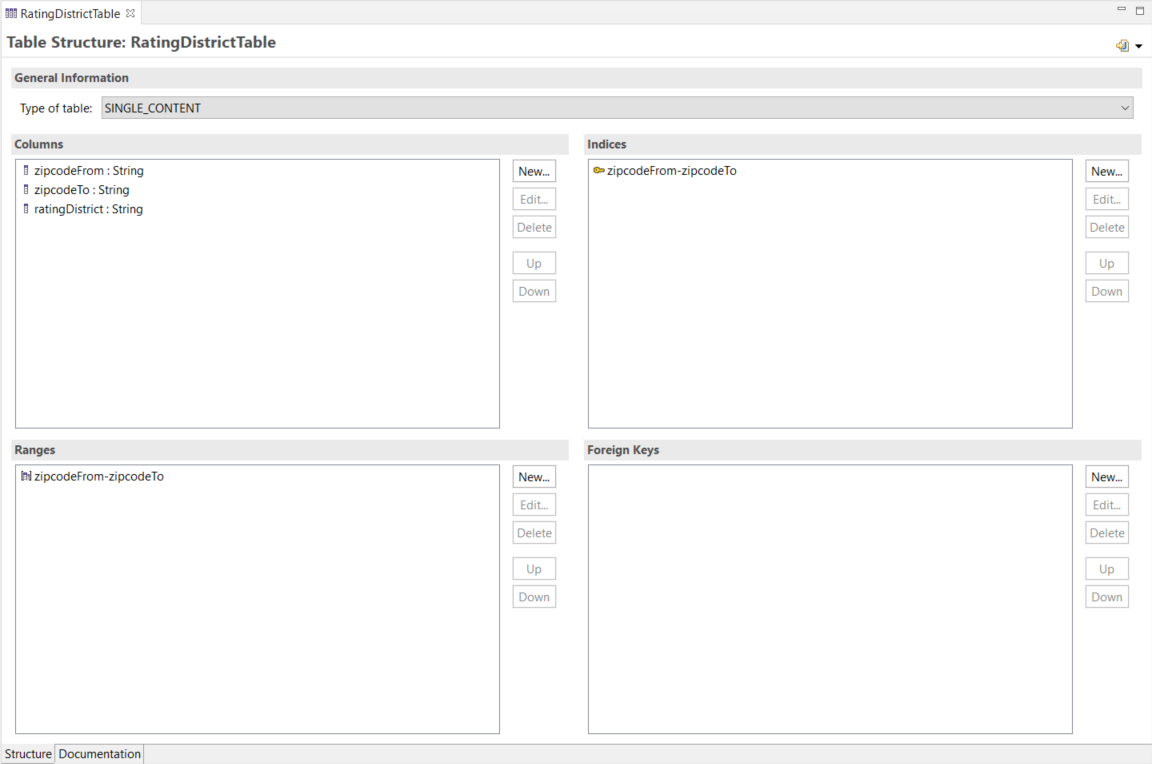
Figure 2. Tablen Structure Rating District Table
Faktor-IPS has now created two more classes for the table structure in the source folder src/main/java in the package org.faktorips.tutorial.model.home.
The RatingDisctrictTableRow class represents one row of the table and it contains one member variable per column together with the necessary accessor methods. The RatingDistrictTable class represents the table contents. In addition to methods for initializing the table contents from XML, a method for finding a particular row has been generated using the unique key:
public RatingDistrictTableRow findRow(String zipcode) {
    // implementation details are omitted
}
Let us now use this class to implement a way to determine the rating district of a home contract. The rating district is a derived property of the home contract, so there is a getRatingDistrict() method in the HomeContract class. This method has already been implemented as follows:
public String getRatingDistrict() {
    // begin-user-code
    // TODO: later we'll implement this with a table lookup
    return "I";
    // end-user-code
}
Next, we will determine the rating district based on the zipcode by accessing our new table:
public String getRatingDistrict() {
    // begin-user-code
    if(zipcode==null) {
        return null;
    }
    IRuntimeRepository repository = getHomeProduct().getRepository();
    RatingDistrictTable table = RatingDistrictTable.getInstance(repository);
    RatingDistrictTableRow row = table.findRow(zipcode);
    if(row == null) {
        return "I";
    }
    return row.getRatingDistrict();
    // end-user-code
}
At this point, you will probably want to know how to get an instance of our table. Because the rating district table only has one content, it provides a getInstance() method that returns this content. The parameter to this method is the RuntimeRepository that provides runtime access to the product data, including the table contents. In order to get it, we use the product that the contract is based on [1].
1 Passing RuntimeRepositories to the getInstance() method offers the advantage that the repository can easily be replaced in test cases.
Next, we will create the table content. The business users will be responsible for maintaining the mapping of zipcodes to rating districts. In order to enhance the overall structure, please add a new package named tables underneath the productdata package of the HomeProducts project. Then select the new package and click the toolbar button  . When the dialog box opens, choose the RatingDistrictTable structure. Name the table content RatingDistrictTable and click Finish. In the editor you can now enter the example rows showed above. After that, the project structure should look as follows in the Project Definition Explorer:
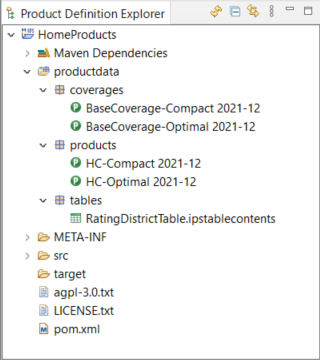
Figure 3. The Product Definition Project Structure
Finally, we will test if the rating district is determined correctly. In order to to this, we will extend the JUnit test TutorialTest of the first part of this tutorial by adding the following test method [2].
2 The tutorial “Software tests with Faktor-IPS” describes, among other things, how this test can be generated and carried out comfortably with the help of Faktor-IPS tools.
@Test
public void testGetRatingDistrict() {
    // Create a new HomeContract with the products factory method
    HomeContract contract = compactProduct.createHomeContract();
    contract.setZipcode("45525");
    assertEquals("III", contract.getRatingDistrict());
}
Rate Table
We want to use a rate table to determine the insurance premium for the base coverage type of our home contents insurance. In the process, we will apply different premiums for our two products.
These rates will be based upon the following tables:
| rating district | premium rate |
|---|---|
I |
0.80 |
II |
1.00 |
III |
1.44 |
IV |
1.70 |
V |
2.00 |
VI |
2.20 |
| rating district | premium rate |
|---|---|
I |
0.60 |
II |
0.80 |
III |
1.21 |
IV |
1.50 |
V |
1.80 |
VI |
2.00 |
Rate table for HC-Compact
The data for different products are often grouped in a single table that includes an additional "ProduktID" column. In Faktor-IPS, however, you can also create multiple contents for one table structure and define the relationships between tables and products!
To do this, create a table structure named "RateTableHome" with a String column named "ratingDistrict" and a Decimal column named "premiumRate". Define a unique key index on the "ratingDistrict" column and choose Multiple Contents as the table type, because this time we want to create different table contents for each product.
For both HC-Optimal and HC-Compact (or, more precisely, for their base coverage types), create two table contents named "RateTable Optimal 2021-12" and "RateTable Compact 2021-12", respectively [3].
3 Replace the “2021-12” suffix with the respective effective date that you are using.
The following diagram shows the relationship between the BaseCoverageType class and the table structure RateTableHome, as well as the related object instances.
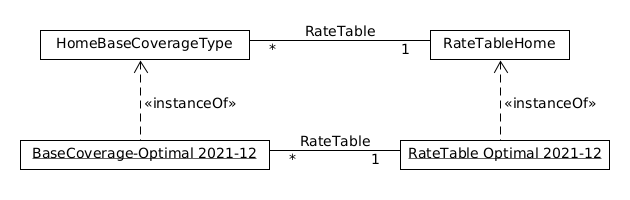
Figure 4. Relationship between Product Components and Tables
In order to define the relationship between tables and products in Faktor-IPS, go to the editor of the HomeBaseCoverageType class. On the second page of the Editor[4], the Table Usages section lists each table structure currently in use. To define a new table usage, just click on the New button near this section.
4 Provided that you have set your Preferences such that your Editors use 2 sections per page.
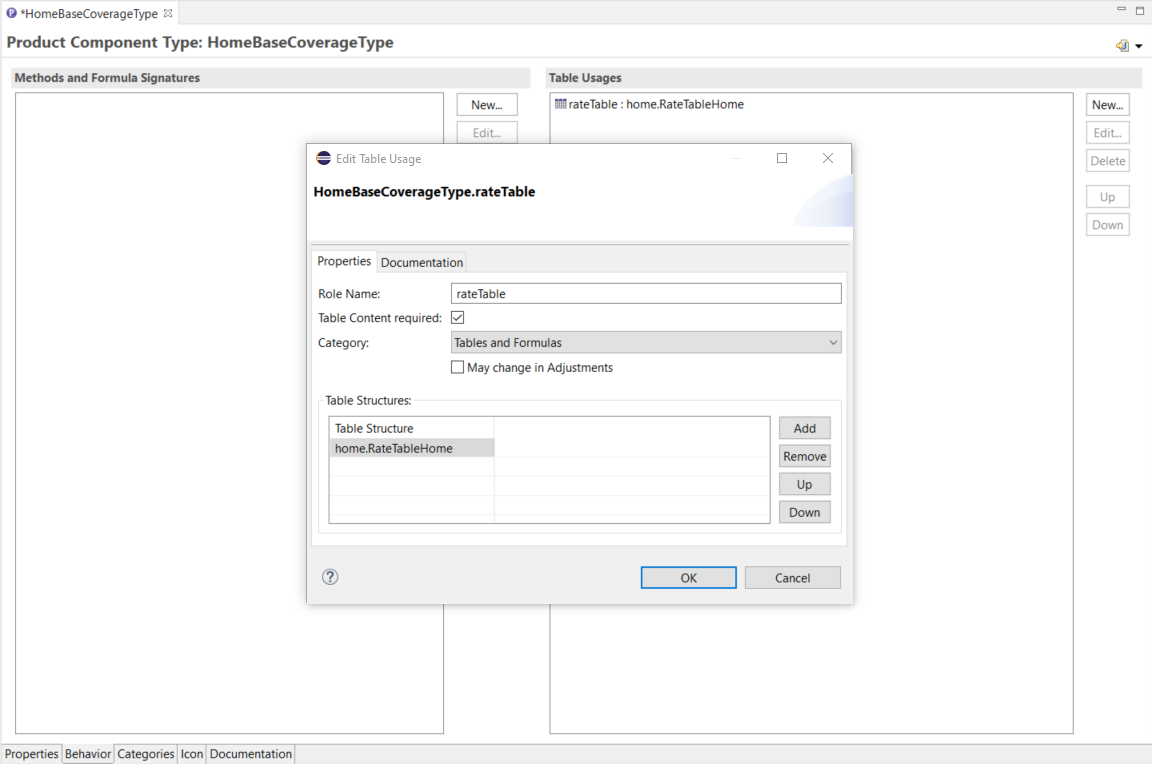
Figure 5. Modellierung der Verwendung von Tabellen
In the dialog box, enter the role name "RateTable" and assign it the RateTableHome table structure.
At this point, you could also assign multiple table structures to allow for different table structures under the rate table role because, for example, new rate characteristics might emerge over time. Finally, enable the "Table Content required" checkbox, because for each base coverage type a rate table has to be specified. After that, close the dialog box and save your settings.
Now we can map the table contents to the base coverage types. First, open BaseCoverage Optimal 2021-12. When a dialog box pops up to tell you that the rate table has not yet been mapped, confirm it with Fix. In the Tables and Formulas section, you can now map the rate table for Optimal and save your work.

Figure 6. Assigning Table Contents
The same process applies to BaseCoverage-Compact.
At the end of this chapter, we will take a look at the generated source code. In the HomeBaseCoverageType class, you can find a method to get the assigned table contents:
public RateTableHome getRateTable() {
    if (rateTableName == null) {
        return null;
    }
    return (RateTableHome) getRepository().getTable(rateTableName);
}
As the respective finder methods are also generated on the table, you can implement efficient table access with just a few lines of code.